Firstly, I intend to make an hour long mash-up that can be made available by the end of this year; as for how it will be available I'm not entirely sure just yet .
(If you want to support this project, please sign up on Rob's forums and support me on this topic here, you'll see what I'm trying to do).
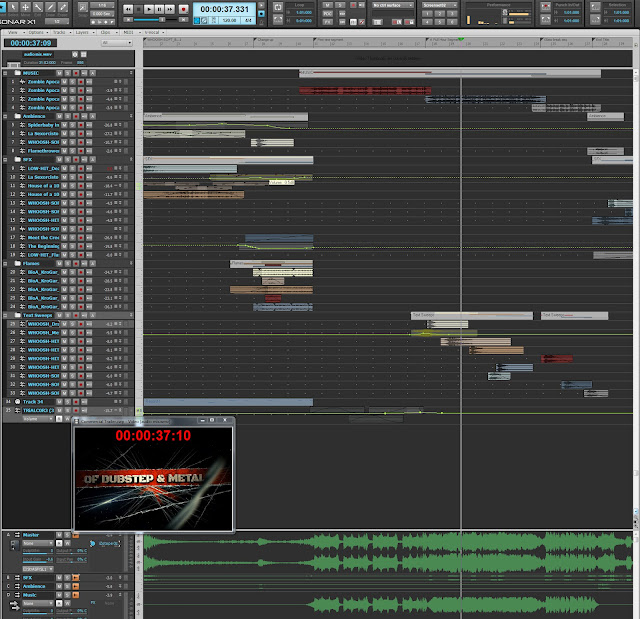
What is this mash-up? I'm building my own remixes as I go, arranging the mash-up in one single project. The Theme is that it's all Rob Zombie's music, hence the title "Zombie Apocalypse". Pretty cool huh?
Let's rewind back to about the end of April. I started a remix project to kind of play around with some dubstep techniques as Troy was doing a homework assignment making a remix of whatever he wanted, to submit for classes he was taking at Pyramind. We had talked about it a week or so prior and then I had mentioned the idea of doing a "Zombie" remix to some other friends. Then the dubstep practice project became a full-fledged idea and I thought, eh... why not?
I started working on it little bits and pieces at a time, and didn't really make much progress the first month or so. It wouldn't be until June where I reached a 3-4 minute mark on the mashup arrangement that I really fleshed out all the details. I've been busy working small jobs trying to keep income flowing: recording local clients, doing commercial video production as (paid) favors of Harry Mok.
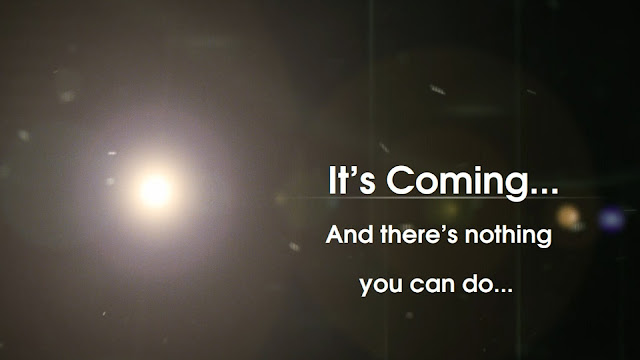
July is already here and I needed to get some motivation behind this project, and decided the first week of July that I want to build a trailer to get some exposure going, and minimally "show-off" some of the completed sections I had built of the mashup. Keep in mind it's still being built and there's hardly any mixing done on it!
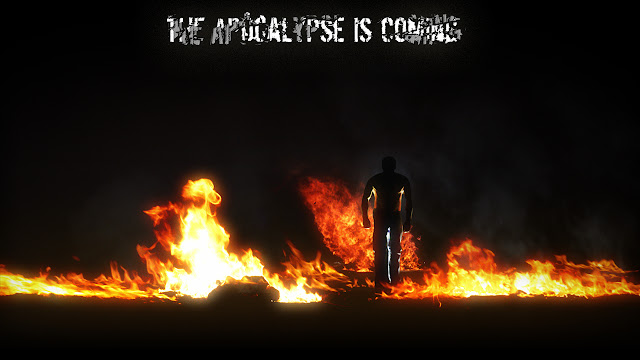
I had an inkling in my head of how I wanted the trailer to come across, and set about building the layout up in After Effects. The first part was easy, simple intro playing off the theme idea for "Zombie" and end of the world theme: a cinematic optical flare with dust flying around in the air, as the camera pans downward to reveal a world in flames, with someone rising slowly in them. At this moment I purely just jotted down the idea to come back to later on and try to tackle how I would build it.
Once some quick motion graphics were roughed out I had to plan out the rest of the trailer segments. I needed a "script". What do I want the commercial to say? What am I getting across? Quick tip: Always keep a notepad and pen on your desk for quick jotting down of ideas. I actually prefer this for day-to-day use as I often will write and re-write TO-DO lists of things on my plate I want or need to get done. This keeps down on clutter on my screen as I used to prefer the Sticky Notes utility that comes with Windows 7.
As I built the trailer I went through about 3 versions of the script as I expanded on the content to fill 60 seconds of play.
There are a lot of video elements that are layered together and the hardest and probably the most complex part was the fire man segment with me standing up in the flames. The first thing I built was the flame sequence. Many video layers placed in 3d space within After Effects, along with separate smoke elements.
Once I got the rough camera motion down and timed everything out. I figured the opening sequence should take a total of 20 seconds even, and the fire segment making for a total of 7 of those seconds.
Timing has to match perfectly, and when it came time to shoot the plate I rallied in my favors I had been doing for the Mok family and they happily provided the lighting equipment and backdrop stands. Mok and I went shopping for a backdrop cloth that I could use to block out the exterior location from my shot (I shot outside in front of my house at night).
I called in another favor to a good friend of mine Tomas who let me borrow his DSLR as backup (which I ended up using as Troy's was having issues). Michael Mok & I started setting up at about 9:30 pm. You can see the setup below in the raw capture on the left and Photoshopped on the right.

Just a quick run-down of the "stage" layout:

For the stage itself we used a cutting desk in the garage that has collapse-able sides and layed it on it's side, but that alone still wasn't tall enough to hide the softbox from the camera, so I grabbed two 2x4x8's that we had laying around because Troy and I have been busy building him a custom desk. These raised it enough and kept it steady when I stood on it so it would not move.
The black cloth I got just over 9 yards of in length and came at a decent width of 60". This worked out perfectly as the backdrop stands we ended up having raised about 8+ feet in the air to cover not only my height for the angle of the camera but also accommodate the fact that the stage was increasing that height.
We did 3 sets, the first set of takes we brought inside immediately to ingest into After Effects to see how the footage looked. I immediately noticed just how bad of camera shake there was even on a tripod. As you can see from the screen grabs above we shot the footage vertically to maximize the use of space in the footage, which meant we couldn't use Mok's solid production tripod and instead had to shoot with a cheaper tripod. It was windy out that night, and that coupled with a DSLR that weighs more than the tripod holding a camera vertically meant it would shake easily.
Normally this kind of wind shake wouldn't be noticeable for a standard kit lens, but we were shooting with an older Canon EF 75-300mm that I borrowed from my older film canon SLR.


This left some guess work to the timing. And unfortunately, it takes almost as long to build preview renders with in premier pro to at least see if audio and video sync and i was just trying to wrap it up and get it online.
If I had all the time in the world to put into making it there are definitely things I would go back and refine but overall this was a solid 2, maybe 3 days of work comfortably I managed in my free time across 3 weeks. And now, back to remixing!
Still to come: A commercial campaign I worked on in May will be published shortly as well as a behind the scenes reel so keep an eye out for more updates as there will be a couple of posts about it here as well. Then, another commercial spot I worked on is out for VFX right now, but once that one is published I'll have a segment on that too.
Several other projects in the works, building a demo reel for a model and actress friend of mine. On a side noteI recently did music and audio post for this little preview:
Lastly, I will be resuming and finishing up the RPM challenge episodes (3 left) for our studio's channel, as well as building a behind the scenes documentary for the Ace Rail commercial mentioned above. Lots of stuff coming!